Monday, April 28, 2008

Sugar, and Cream, and Chocolate...oh my!

Dark Chocolate Toffees/Caramels, adapted from Milk Chocolate Caramels with Fleur de Sel from Chocolate Epiphany by F. Payard.

Ingredients & Equipment:
Parchment Paper
9 x 13-inch baking pan
large sauce pan, with deep sides
candy thermometer
cooking spray

1 cup heavy cream
2 cups sugar
2 teaspoons salt
6 ounces dark chocolate, chopped and melted


Prepare the pan: Line your baking pan with either the parchment paper, leaving the parchment to overhang the edges of the tray. Spray the parchment with cooking spray.

Making the candy: Over medium-high heat, combine the cream, sugar and salt in your saucepan, stirring until the sugar has dissolved. Once dissolved, attach your candy thermometer to the saucepan and cook the caramel to hard ball state (just past 250* F ... this may take a while, as you'll be reducing the cream down before the caramel can reach that temperature). As soon as the caramel hits the appropriate temperature, remove from the heat and stir in the melted chocolate.

Pour the candy into your baking tray, quickly spreading it out into an even layer. Allow it to cool to room temperature before cutting or breaking into bite sized pieces.

The finished candy is hard at first, then as you chew it or allow it to melt in your mouth, it becomes more caramel or taffee-like in consistency.

*for a softer more caramel-consistency of the finished candy, cook the caramel only to soft ball temperature before removing from the heat and stirring in the chocolate.

Labels: , , ,

Wednesday, May 16, 2007

Mmm Pizza

Baked v Grilled...that is the question. I was hoping for grilled, what with the temperatures well into the low 100's down here already - anything to save me from having to adding heat to the house is wonderful.

I really liked the flavor imparted to the pizza crust with the high temps on the grill, but I have to admit my technique leaves something to be desired as I had to move the pizza to the oven to finish as I was worried about burning the crust.

Technique inspired by Raquel, using the crust recipe at the bottom of her post. Incidentally, her pizza toppings are much more exotic compared to my rather mundane tastes of pepperoni, cheese, onions and peppers ;)

Anyhow, since the dough makes enough for 2 pizzas, I made the 2nd one in the oven - as you can see, I got a rather large thin crust pizza out of it as it's completely overflowing the pizza peel (though it fit perfectly on my perforated pizza "pan").

Wednesday, March 07, 2007

I heart Carbs.

I love bread. And Pasta. And Cake. And Potatoes. And all kinds of other carbolicious foods.

I've been on a quest to learn how to reproduce (to the best of my ability with the lack of fully appropriate tools) various rustic hearth breads. I had acquired the book No Need to Knead: Handmade Italian Breads in 90 Minutes in my quest for such delicious bread, but have not had much time to experiment with the recipes inside.

Anyhow, a while back, I saw a recipe posted for a No Knead bread that is an adaptation from a recipe from the Sullivan Street Bakery.

This weekend, I had some time on my hand and decided to give it a try...


Recipe: No-Knead Bread
Adapted from Jim Lahey, Sullivan Street Bakery
Time: About 1 1/2 hours plus 14 to 20 hours' rising

Ingredients:
3 cups all-purpose or bread flour, more for dusting
1/4 teaspoon instant yeast
1 1/4 teaspoons salt
Cornmeal or wheat bran as needed.

Method:
1. In a large bowl combine flour, yeast and salt. Add 1 5/8 cups water, and stir until blended; dough will be shaggy and sticky. Cover bowl with plastic wrap. Let dough rest at least 12 hours, preferably about 18, at warm room temperature, about 70 degrees.

2. Dough is ready when its surface is dotted with bubbles. Lightly flour a work surface and place dough on it; sprinkle it with a little more flour and fold it over on itself once or twice. Cover loosely with plastic wrap and let rest about 15 minutes.

3. Using just enough flour to keep dough from sticking to work surface or to your fingers, gently and quickly shape dough into a ball. Generously coat a cotton towel (not terry cloth) with flour, wheat bran or cornmeal; put dough seam side down on towel and dust with more flour, bran or cornmeal. Cover with another cotton towel and let rise for about 2 hours. When it is ready, dough will be more than double in size and will not readily spring back when poked with a finger.

4. At least a half-hour before dough is ready, heat oven to 450 degrees. Put a 6- to 8-quart heavy covered pot (cast iron, enamel, Pyrex or ceramic) in oven as it heats. When dough is ready, carefully remove pot from oven. Slide your hand under towel and turn dough over into pot, seam side up; it may look like a mess, but that is O.K. Shake pan once or twice if dough is unevenly distributed; it will straighten out as it bakes. Cover with lid and bake 30 minutes, then remove lid and bake another 15 to 30 minutes, until loaf is beautifully browned. Cool on a rack.
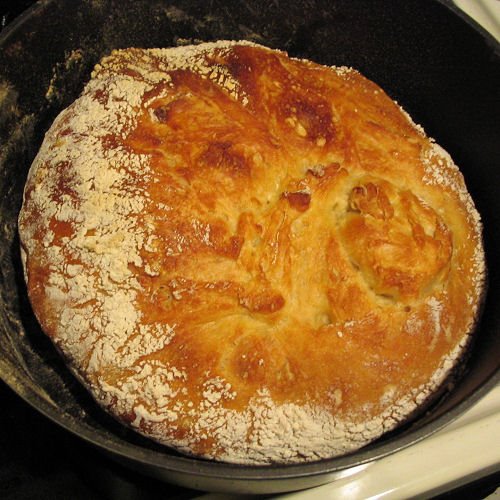
The Results?


Well, the bread came out and made a most satisfying crackling noise as it was cooling - the crust is wonderfully chewy and very tasty. The middle bit, while tasty, still didn't develop the large holes I was looking for - though it did on one side.

The only think I can think is I may have played a bit too much trying to get the rather slack dough into an approximate ball shape. I suspect the dough was a bit too wet as even with a heavy dusting on the towel that it sat upon for the 2nd rise, it was stuck quite firmly when came time to transfer the dough to the pot for baking.

I'll definitely be trying this method again :)

Tuesday, November 28, 2006

Fresh Roasted!

Storyville Coffee - date stamped on the day it's roasted and sent off in a special resealable bag with a one way valve (to let your beans exhale, as it were).

If you've a coffee connoisseur on your gift list this holiday season, a gift of Storyville beans may the perfect thing.

They have 2 versions of their rather tasty signature blend available - Prologue (caffeinated) and Epilogue (decaffeinated).

I rather liked the sample of coffee I received - not too dark, and very flavorful - if you don't have access to a fresh small-volume roaster, you'll want to taste it for yourself :) Me? I've been hooked on freshly roasted beans for a while and I'll never go back :P


Wednesday, October 18, 2006

I *had* to try it


I love Matcha flavored things - so when I saw this cake mix while shopping at Trader Joe's, of course I had to buy some and give it a whirl...

The making is as easy as any other cake mix, and this one is a bit kinder on the waistline than the very tasty Trader Joes Brownie mix...which, by the way is fantastic and substitutes just fine for brownies baked from scratch - but we're supposed to be talking about Matcha Cake.

The batter doesn't look terribly enticing when mixed - it has an odd resemblance to guacamole...


See?

The cake, once baked has a definite flavor of green tea, and thankfully, the guacamole green color is much more subdued...though perhaps it's difficult to tell since the sun was on its way down for this photo. The only green colored cake that I welcome is Pandan cake.

The crumb was um...a bit tougher than anticipated, and only mixed til combined...and I checked the cake for done-ness 5 minutes before the earliest "done" time marked on the box (and it wasn't done yet at that point).

Ah well, I really can't complain - it is a cake mix after all.

hmm back to that Pandan cake - anyone know where I can get one short of flying to Malaysia? I've never seen one at my local asian markets...

Monday, August 21, 2006

Peanut Butter Goodness

I love peanut butter. I am one of those people happy to sit and eat it straight out of a jar.

I love it paired with jam, jelly or honey...and if none of those are around, a little bit of crunchy sugar goes well too ;) PB and chocolate is always a favorite, and it's not bad with sliced apples...of course, on occasion, I have been known to eat it paired with Marshmallow Cream (I can't get Fluff out here).

This past weekend, I figured I'd try my hand at Peanut Butter Ice Cream - after all, Ben & Jerry's Peanut Butter Cup is one of my favorite flavors - and I had more than enough half and half in the fridge.

Adapted from Kitchen Chick as I don't keep whole milk or cream in the house (and I find both of those to create a too-rich ice cream for my tastes).

Peanut Butter Ice Cream
ingredients
1 cup peanut butter (I used Jif Extra Crunchy)
3/4 cup granulated sugar
1 cup milk (I used skim!)
1 1/3 cups half and half
2 tsp vanilla extract

Method:
Combine the peanut butter and sugar until smooth. Add the milk. Blend on low speed until smooth and the sugar is dissolved. Stir in the half and half and the vanilla until well mixed.

Chill the mixture overnight

Pour into your prepared ice cream maker and enjoy!

Yield: approximately 1 quart

Comments: The Extra Crunchy Peanut butter gave great taste, but if you don't like the crunch of the peanuts or find them distracting, you might want to cut the amount with regular Creamy style peanut butter...The ice cream came out to soft serve consistency in my machine - so I scooped it into a separate container for "ripening" to get it to a normal ice cream consistency. The ice cream goes great with hot fudge or hot ganache ;)

Wednesday, June 07, 2006

Absorption Pasta?

Why yes. Absorption Pasta. I had to try it when I saw Clotilde post about it here - well, actually I read it, thought it was an interesting technique and promptly forgot about it...until Raquel and I were discussing cooking plans for the evening. Desperate for something healthy, but quick and different, I decided to give it a try. Instead of cacao nibs and zucchini, I opted for Tuscan beans and carrots. Pasta used: mini penne - and I opted for the stock instead of water.

I don't know if it was the pasta or if the heat was too high or a combination thereof, but it sure seemed like I had to add a lot of stock to get the pasta to a "done" state - of course, I was hungry and impatient, nibbling on mini-penne at a somewhat fair frequency. The stock didn't have much salt, and a liberal hand was used with the Parmesan, kosher salt & pepper.

Sorry, no photos - my food styling wasn't doing so well, and honestly, I couldn't dream of turning out a photo more beautiful than the original. Definitely worth trying - and it beats bringing the large pot of water to a boil to cook the pasta ;)